Monday, August 12, 2013

why wool rules!

With the temperatures in the Lowcountry nearing the 90's, it hard to imagine why anyone would put wool on their baby!?!  However, wool is a natural fiber that is breathable, biodegradable and renewable. It keeps us warm in the winter and cool in the summer. It also has the awesome ability to absorb 30 percent of its own weight in moisture without feeling damp! If you have a heavy wetter or are having trouble with leaks overnight than wool may be the perfect option for you. Wool covers, shorties or longies paired with an organic cotton fitted diaper, a hemp/cotton blend fitted or even a prefold underneath work wonderfully.  Wool is also naturally anti-microbial- meaning it does not need to be washed after every use. You can let the cover air dry in between uses. If you notice that it is starting to leak, it may be time to lanolize. 

Lanolin is a natural substance produced by a sheep’s skin. It interacts with the ammonia in urine to produce a natural soap like compound. This keeps your wool from developing odors and means that you only have to wash your wool once every week or two. Lanolin also helps to make wool diaper covers more water resistant.

How to wash your wool:Fill your sink with enough lukewarm water to sufficiently cover your wool. Add a bit of woolwash (Eucalan is great option) to your running sink water. Let it sit for at least 15 minutes. Eucalan is formulated so there is no need to rinse. Drain water and gently squeeze wool. Lay in between 2 bath towels and roll to remove excess water. Or if you are doing several covers, put them in your washing machine and run the spin cycled (no water) to quickly and efficiently spin out the excess water. Reshape, and lay flat to dry away from direct heat or sun.  Do not machine dry your wool! It will shrink! 

How to lanolize your wool:Prepare your sink with warm water and wool wash.  Take a small jar and add a pea sized amount of lanolin, drop of baby shampoo, and very hot water.  Shake to completely dissolve the lanolin and add this to your sink, swish to mix, then add your wool cover inside out.  Allow the wool to soak for about 15-20 minutes, then drain allowing the lanolin rich water to run through the cover.  Make sure your wash water remains relatively warm to prevent lanolin from pooling and forming spots.

Our wool from Babee Greens is made from upcycled sweaters and is really adorable. Check it out:

Come talk with us if you are interested in trying out wool. 


Monday, July 29, 2013

hyped about hazelwood!

Jackson has been wearing his baltic amber teething necklace since he was about four months old. I always get a lot of questions about it when people who are not familiar with them notice that my 8 month old is wearing a necklace. The questions continue to come now that we added another piece of jewelry... a hazelwood necklace.

Around six months he started to develop what I thought to be eczema all over his chest and back. The little patches were red and always seemed to be worse after the bath. At his six month appointment the pediatrician took a look and confirmed what I already suspected. I had pretty severe eczema when I was little and all through my teenage years. I'm pretty sure I tried every cream on the market and nothing ever really cleared it up. I hated that Jackson was going to have to suffer like I did. She said to keep an eye on it and if it got worse, she would prescribe a cream. This prompted me to do some research. I remember hearing about hazelwood as some of my friend's babies wear them.

What I found is that hazelwood helps to create an alkaline environment in your body, which may alleviate many of the symptoms cause by being too acidic. Hazelwood is an alkaline wood and has the natural property of absorbing and neutralizing the body's acidity through contact with the skin. By doing so, the necklace can help with eczema, acid reflux, migraines, heart burn, nausea, arthritis, digestions, constipation, skin problems, etc.

After putting Jackson's necklace on, his eczema cleared up within one week! My husband even mentioned the difference (and sometimes he is a little skeptical of my "ideas.") Since he does have sensitive skins, we are always careful to use skin care products that are organic (love Wash with Water shampoo and wash) and unscented as well.

Hazelwood is similar to baltic amber in that it should be worn as much as possible. I always take both of his necklaces off and double wrap them around his ankle at night while he is sleeping. Hazelwood can be left on in the bath as keeping the hazelwood moist aids in the wood absorbing the body's acidity. You can wet the necklace any time you need an extra boost! Wearing the necklace in the pool or other chlorinated water is not recommended.

The life span of the hazelwood will depend on the level of acidity in the body. In general, a necklace will maintain its medicinal benefits for 6 months to 1 year. Indicators that the necklace is losing effectiveness are that the ends of the wood beads (the flesh) will darken and/or symptoms will return.

I am so happy to have found some thing that helps with his eczema. He has never suffered from acid reflux but I have heard that hazelwood works wonders for that as well. Obviously, I am not a doctor so please don't misconstrue any of my blogging as medical advice!

Friday, July 12, 2013

all about amber (teething necklaces, that is)

Have you heard about amber teething necklaces before? Maybe you have seen a baby wearing a necklace and were wondering if it was just for "fashion?" Well guess what? It is not! Amber is a natural alternative to relieving the discomfort of teething in babies. There are some common misconceptions about amber and I will help to clarify some things in this post. 

Baltic amber is not a stone, it is a fossilized tree resin. It has been used as a natural and traditional remedy for many ailments for centuries. Long ago it was considered one of the leading "medicines" of its time. When it is worn on the skin, the skin's warmth releases trace amount of healing oils from the amber. 

Amber teething necklaces are NOT meant to be chewed on (contrary to Chewbeads, which are made from food grade silicone!) They are worn around the neck of the baby. The amber must be in contact with the child's skin in order to be effective. I always recommend that the necklace is sized properly in that it is not long enough for the baby to pull the necklace up and into their mouth. It needs to be tucked underneath their shirt. 

Concerned about succinnic acid? Here is some information taken from www.babyteethingnecklaces.com that addresses succinic acid. 

"The active ingredient in Baltic amber is succinic acid, which was analysed by the pioneer of modern bacteriology and Nobel-prize winner Robert Koch (1886). He confirmed its positive influences and discovered that there is no risk of the accumulation of surplus amounts of succinic acid in the human organism. Recent scientific research has also proved that succinic acid has a very positive influence on the human organism, it strengthens the body, improves immunity, the course of energy-related processes and the balance of acids. Current research shows that the micronization of amber improves its assimilation by the stress-weakened organism of the contemporary man. The unfavorable environmental conditions prevailing today block the natural flow of energy-related processes in cells. Blocks affect cellular metabolism and significantly weaken the immune system, but the natural energy of amber is able to stimulate its renewal."

I always recommend that the necklace is removed from the child's neck when sleeping. I double wrap Jackson's around his ankle and put a sock or footie pajamas over it so he can't get to it. I also take his off at bath time, pool, sunscreen, etc. so it is not exposed to any residue. The brand I carry is double knotted between each bead so if the necklace was to break the beads will not come off and be a choking hazard. 

I hope this helps clear up some of the questions that I often receive regarding amber teething necklaces. 

Monday, July 8, 2013

How many diapers will I need?

How many diapers will I need? 

This is another question that I get asked a lot! The number really depends on how often you are changing your baby and how often you plan to wash. During the newborn days babies poop.... a lot. You are changing them just about every 2 hours and you are changing them in the middle of the night before/after feedings. This leads to about 12 diaper per day. As they get older, they are not going as often and can usually go longer between changes. Here is a good chart to help you decide how many diapers you will need:

         Age                                          Wash Daily                  Wash every 2 days
Newborn- 6 months                         10-12 diapers                    20-24 diapers
6-12 months                                      8-10 diapers                    16-20 diapers
12-24 months                                    6-8 diapers                       12-16 diapers
potty learning                                     2-4 diapers                       4-8 diapers 

Also, remember that cloth diapering doesn't have to be "all or nothing." A lot of families will start out using cloth during the day and still use disposables at night until they are able to build up their cloth diaper stash. While building a stash of cloth diapers can be pricey at first- it will save a lot of money in the long run! Of course, this is just a general guesstimate as to how many cloth diapers you will need. It may vary from family to family. 

Saturday, July 6, 2013

Registry for Drew and Cara!

I am so excited to announce that Drew and Cara have registered at eat / sleep /play. They are already blessed with an adorable girl and around the middle of November a little boy will be joining their family. 

To purchase, please stop by the store or call 843.754.4488 or email espbabystore@gmail.com.


Mod Swad Original Sleeper (heather gray) $35.00
  Bummis Diaper Pack (infant) $43.00


Bummis Prefolds (infant) $18.00


Bummis Biosoft Liners (small) $6.00


Bummis Super Brite Cover (blue) $14.00


Kawaii One Sized Snap Dipers (boy/gender neutral) $10.00 each

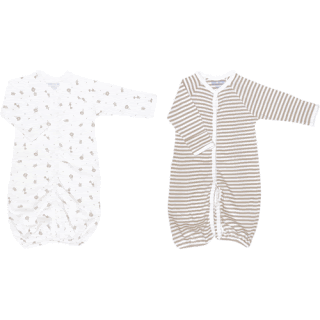
Under the Nile Convertible Gown (tan/stipe) $30.00


Under the Nile roll over pants (blue stripe) $16.00


Planet Wise Pail Liner (navy) $17.00


Rockin' Green Laundry Detergent (motley clean classic) $17.00
Boba 3G Carrier (dusk) $120.00


Guava Mitts 2 pack (boy) $24.00


Nose Frida $16.00 and filters $3.00


Chewbeads Hudson (black) $37.00


Planet Wise Wet Bag Medium (carnival skulls) $17.00


Morado Designs Onesie (3-6 months) $26.00


 Small Plum Oneise (3-6 months) $25.00

Bio Me 5 Onsie (3-6 months) $24.00
Mod Swad Fashion Sleeper (cream) $37.00


And of course, Cara and Drew would appreciate a gift certificate in any amount! 


Monday, July 1, 2013

Prepping, washing, stripping... oh my!

One of the most frequent questions I get asked about cloth diapers is "how will I wash them?" Once you get your routine down, the washing is as simple as doing your every day laundry.

The first thing you need to do when you get purchase your new diapers is prep them. Prepping simply means washing them before you use them. Prepping the diapers will remove any residue from manufacturing,  allow them to "fluff up" and they will become much softer. Diapers made from different types of fabrics will need to be prepped differently. I do recommend following any of the manufacturer's directions for prepping as they may vary slightly.

Prepping:
In order to prep all-in-one (AIO) and pocket diapers that have microfiber inserts (examples of these are bumGenius and Kawaii) you can wash them once with warm/hot water. You can use detergent (cloth safe, please!) when prepping but it is not required.

Prepping natural fibers (unbleached cotton, bamboo, etc.) are a little different. These diapers must be washed in hot water and dried between 3 to 5 times before they reach their maximum absorbency. Multiple pre-wash and dry cycles will remove any natural waxy oils on the fabric and allow them to absorb much better. Again, detergent is not required.

Synthetic fibers and natural fibers can NOT be prepped together due to the oils that natural fabrics contain. However, after the diapers are prepped they can be washed together. Whew!

Now that your diapers are prepped you can start using them and then you will settle on a wash routine. Again, each manufacturer may propose a wash routine for their diapers. I always recommend following that.

Washing:
We briefly discussed detergent in my previous entry. My "go-to" cloth diaper detergent is Rockin' Green however there are many other brands that are cloth safe as well. A common misconception is that detergents labeled "all and clear" are cloth safe. This is not always the case because they can lead to detergent build up that will cause leaking.  I wash my diapers every other day. This is the routine I follow:

Step 1: I run a cold cycle with OUT detergent. This helps to remove any stains and gets the "ickies" out of the diapers.

Step 2: I run a hot cycle with 2 tablespoons of Rockin' Green (this amount may vary if you have a HE machine.) I also add an extra cold rinse to this cycle.

Step 3: I toss my inserts, wet bag, pail liner and cloth wipes into the dryer. I hang all of my covers and AIO's on a drying rack. I do not dry my covers in the dryer.

It is that easy! 

When babies are exclusively breast fed their diapers can be thrown straight into the washing machine with out any extra work. This is because breast milk is water soluble. Once babies start solids and their waste become a little more.. well... solid, it does require an extra step. Any waste must be removed from the diaper before it is put in the washing machine. This is when flushable liners or a diaper sprayer come in handy.

I also want to reiterate the amazing work that the sun can do for diapers. I sun my diapers every chance I get. It removes all of the stains and my diaper will look brand new. It also helps to cut down on drying time.

Stripping:
If your diapers are leaking or starting to smell a little funky the second they get wet or soiled then you may need to strip. Stripping diapers removes detergent buildup and corrects improper wash methods. Just like there are many different wash routines, there are many different ways to strip. As always- I always recommend following the manufacturer's suggestions. 

bumGenius recommends adding 1/4c of bleach to your hot wash cycle once a month to avoid any of the issues mentioned above. 


You can also use a product called RLR Treatment to strip your diapers. 

You add the entire packet into your hot wash cycle without detergent or any other laundry additives.
Continue repeating hot wash cycles until you can look in your top loader or view through the window of your front loader and not see any foam or suds; the water should be clear.


Please remember to never use dryer sheets with your cloth diapers, in fact, I don't recommend using them for your regular laundry in a dryer where your diapers will be dried. You also should never use the "sanitize" cycle on your HE machine. That water gets way too hot and can ruin the waterproof lining in your diapers. Also, most diaper rash creams are not cloth diaper safe. I carry two great diaper rash creams that are: Earth Mama Angel Baby and Lost River Naturals. If you have to use a diaper rash cream that is not safe than always put down a barrier between the cream and the diaper. Fleece liners or flushable liners are great for this. 
Well there you have it, the basics of washing your diapers. Once you get into a routine it will be like second nature. I really believe that a good wash routine is key to taking good care of your diapers. If you are having to strip your diapers more than once every couple months than your wash routine may need some tweaking!


Thursday, June 27, 2013

Cloth Diapering Accessories

Since we have covered the different types of cloth diapers we are going to discuss the "extras" you may need. I am going to list them in order of importance (my personal opinion- yours may vary!)

Detergent: Ask any cloth diapering mama what laundry detergent she uses for her diapers and you will get 10 different responses. This goes for wash routines as well but that is a whole separate blog entry! I have used Rockin' Green Detergent from the start and have had WONDERFUL luck with it. Jackson has very sensitive skin and it has never given him a rash or even made him red. I think they key to cloth diapering is a good detergent along with a good wash routine. Because of that I recommend Rockin' Green. Yes, your sister's husband's wife's cousin makes her own laundry detergent and has never had any issues but I will stick to my Rockin' Green. We use Bare Naked Babies (the unscented version.)  I use 2 tablespoons, wash every other day and 1 bag lasts me about 2- 2 1/2 months. For $17 bucks and no stink issues- I'll take it!


Wet Bag/ Pail Liner: Both of these have been a must for me. I carry a medium size Planet Wise wet bag in my diaper bag at all times. It holds between 5-7 diapers and has a zipper closure so it keeps the "stink" in.
                                    

I wash this every time I wash my diapers (every other day.) I dump all of the diapers into the wash, no need to touch them. Then throw the bag in the wash with the diapers. Simple as that! 

When we are at home, I use a Planet Wise Pail Liner because this holds more diapers. It fits right into a standard size kitchen trash can (lid and foot pedal are a definite plus!) I empty this the same way as my wet bag. Dump it and straight into the wash. 
Planet Wise also has a large size wet bag. It zippers closed and has a handle that can hook to the door knob/changing table. 


Some people use these instead of a pail liner. I did at first but once Jackson started to roll and I was more cautious about leaving him on the changing table unattended (I know.. I know.. bad mom) I switched to the liner with a trash can so I could do everything with one hand. 

Drying Rack: I try to sun my diapers as much as possible. The sun is amazing for getting out stains, removing stink, saving money, etc. I use a foldable drying rack that way I can hang them in the house if it is raining or easily move it to the back deck on a sunny day. Something like this works great!
Cloth Wipes/Solution: These are not a necessity but they really make things so much easier. I used to use disposable wipes while I was out but found it a real hassle having to separate the wipe from the wet  bag or finding a trash can if I wasn't changing him near a trash can. I used cloth wipes at home so I'm not sure why I waited to so long to use them out and about. I now use a Planet Wise Wipe Pouch and flannel wipes that I wash right along with my diapers. 

I store my wipes dry and use a diaper solution spray that I spray onto the cloth wipe right before I change him. Some people like to store their wipes wet, either way is fine and this bag is perfect for either option.

Flushable Liners: Flushable liners are a great solution for when baby starts solid foods and you must remove waste from the diaper before putting them in the wash. They lay on top of the diaper and you can flush them right down toilet. They are also great to use if you are fighting a stubborn diaper rash and have to use a cream that isn't cloth diaper safe. I also used them for the early days of the meconium poos that are notorious for staining your beautiful new diapers you have been waiting to try out. 


Diaper pins? Gone are the days that diaper pins are needed to secure a flat/prefold. We used Snappis, they worked great for us but I really became a fan of the trifold rather than using a Snappi. This is how a Snappi works:
\
I recently found Boingos which are similar to Snappi but require less work and are a lot cuter! Also great for reflux or colicky babies because the tab does not stretch across their sensitive tummy. These will be at the store very soon and I will let you know what I think about them.  Here is how Boingos work:

Diaper Sprayer: This is another option for getting the solid waste our of a diaper before washing (instead of flushable liners.) It hooks to the back of your toilet so you can spray the diaper contents into the toilet. This is not on my must have list but some people can't live without them. You will find what works best for your family!  
                                               

Extra Inserts/Doublers: Extra inserts or doublers are great for naps/overnight/long car rides. They increase the absorbency in the diaper and help to prevent leaks. There are several different types: microfiber, bamboo, hemp, charcoal bamboo, etc. I have never had to purchase extra inserts as most pocket diapers come with two and that has always worked fine for us. I use two microfiber inserts in a pocket diaper at night or occasionally one bamboo and one microfiber and we don't have any leaks. Once again, you will find out what works best for your family. 

Now that we have discussed all of the "extras" we will move onto prepping/wash routines/stripping... stay tuned.